5 Steps to Vet Clients for Clear Expectations

5 Steps to Vet Clients for Clear Expectations
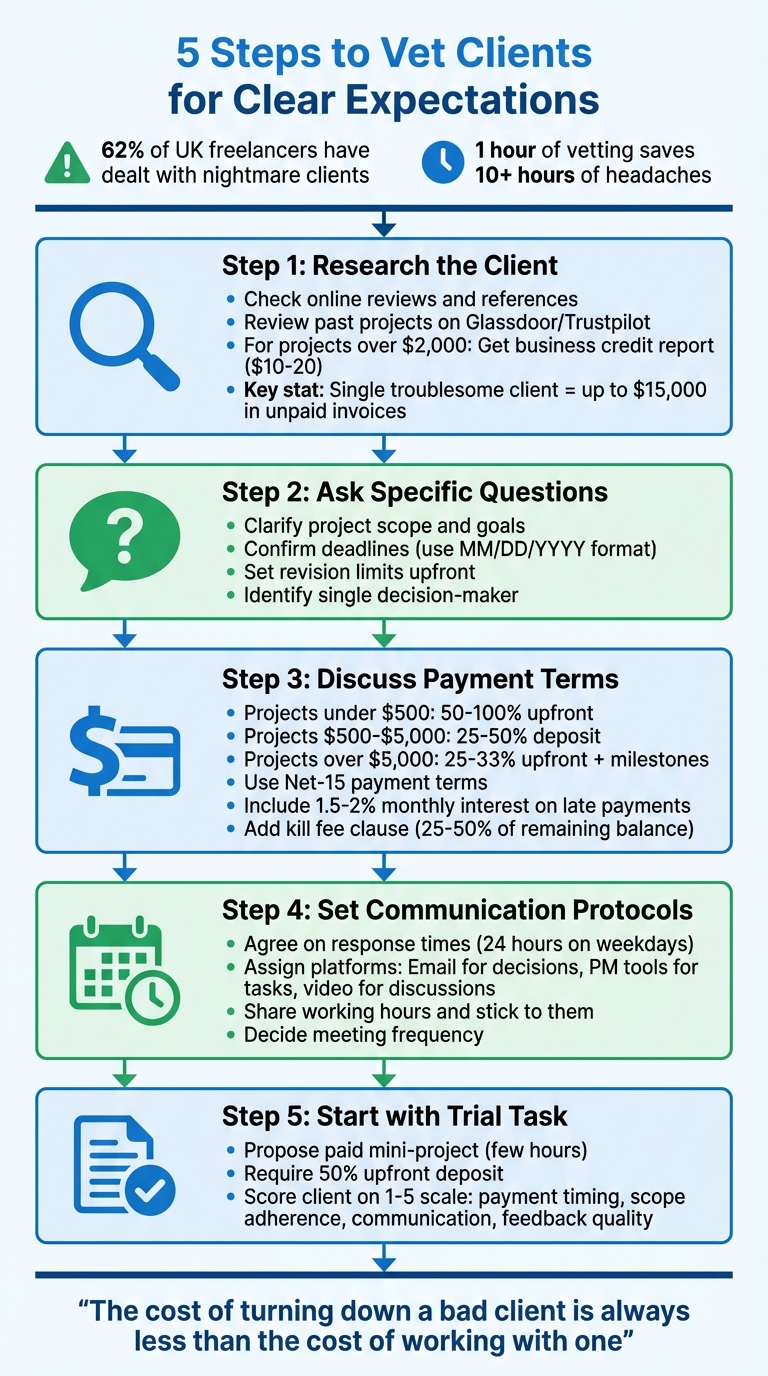
Freelancers often face clients who bring more trouble than value - late payments, unclear project requirements, or poor communication. 62% of UK freelancers have dealt with "nightmare clients." The solution? Vet clients upfront to avoid wasted time and stress.
Here’s how to protect your time and income:
- Research the Client: Check reviews, forums, and their financial stability to spot red flags like unpaid invoices or poor management.
- Ask Questions: Clarify project goals, deadlines, and revision limits to ensure everyone is aligned.
- Set Payment Terms: Use deposits, milestones, and clear deadlines to secure your income and avoid disputes.
- Define Communication Rules: Agree on tools, response times, and meeting schedules to maintain boundaries.
- Start Small: Test the relationship with a paid trial project to gauge reliability and compatibility.
Investing an hour in vetting can save you 10+ hours of headaches later. Tools like Paid on Time simplify payment processes, letting you focus on clients who respect your work.
5-Step Client Vetting Process for Freelancers
Step 1: Research the Client's Background and Reputation
Take five minutes to dig into a client's background before committing to a project. As Landolio wisely points out:
"The five minutes you spend checking a client before you start could save you five months of chasing after you've finished".
This small effort could save you a fortune. A single troublesome client can leave you with as much as $15,000 in unpaid invoices. The good news? Most warning signs are easy to spot if you know where to look.
Check Online Reviews and References
Start with a quick Google search using phrases like "[Company name] + not paying" or "[Company name] + late payment." This can lead you to freelancer forums or Reddit threads where people share their experiences. LinkedIn is another great tool - verify that the company has actual employees with credible professional backgrounds instead of relying solely on their website.
Community forums are also valuable resources. If you notice recurring complaints about ghosting or scope creep, consider these red flags. And if a client constantly criticizes past freelancers, take note. Freelance designer Sagar Vaishnava offers this crucial advice:
"When someone tells you every designer before you was incompetent, you're about to become the next incompetent designer in their story".
Review Past Projects
Look into the client’s past work and partnerships to assess their professionalism. Platforms like Glassdoor and Trustpilot can shed light on potential issues like cash flow problems or poor management that might impact you as a contractor. For registered companies, free resources can help you confirm their legitimacy and financial stability.
For larger projects exceeding $2,000, it might be worth spending $10–20 on a business credit report from providers like Creditsafe or Experian Business. These reports can highlight payment habits and red flags, such as negative net assets or significant debt. Late filing of annual accounts, for example, is often a strong indicator that a company may delay payments. Considering the cost of a credit report is typically less than 0.5% of your project’s value, this small investment can prevent major financial headaches.
Once you’ve gathered this information, you’ll be ready to ask sharp, qualifying questions tailored to your concerns.
sbb-itb-66f4c95
Step 2: Ask Specific Qualifying Questions
Now that you've done your research, it's time to talk directly with the client to confirm your findings. This step is crucial - it helps you figure out whether this collaboration is worth pursuing or if it might lead to challenges. Pritika Debbarma, a Google and Facebook Ads Tracking Expert, sums it up perfectly:
"Clarity up front saves hours of confusion later."
This isn't just about answering their questions; it's a chance for you to evaluate them too. The goal is to ensure you're both on the same page and to set clear expectations.
Clarify Project Scope and Goals
Start by digging into the purpose of the project and what success looks like. This helps you set realistic expectations from the beginning. As Asma Noor from Millo.co points out:
"Understanding the 'why' behind the project can help keep you motivated as you work towards achieving it."
Ask detailed questions about the deliverables. Is this a one-time project or part of an ongoing collaboration? Are there specific requirements, like branding guidelines, print-ready files, or particular file formats? Get clarity on how success will be measured and whether the work is for personal or commercial purposes. Also, don't hesitate to ask why they’re hiring a freelancer instead of handling it internally. Their answer can give you insight into their company’s culture and how they view external expertise.
Getting all of this information upfront helps avoid miscommunication and potential disputes later. Once you’ve nailed down the project scope, shift your focus to deadlines and revision policies.
Confirm Deadlines and Revision Policies
Establish clear deadlines for drafts and final delivery - use precise MM/DD/YYYY dates to avoid confusion. Break the project into milestones and confirm how quickly they’ll provide feedback. If a client expects instant results but takes forever to respond, it’s a red flag.
Set strict limits on revisions. Pritika Debbarma warns:
"When a client says, 'It's just a few quick edits,' alarm bells should go off. Because 'a few' can easily turn into 'rewrite everything from scratch.'"
Specify the number of revisions included in your agreement and outline extra charges for additional edits. To streamline the process, ask the client to designate one person as the final decision-maker - this avoids conflicting feedback from multiple sources.
If the deadlines seem unrealistic, propose an adjusted timeline. As Debbarma advises:
"Good clients will work with you to set a realistic timeline. Bad ones will guilt-trip you into burning out."
Step 3: Discuss and Document Payment Terms Upfront
You've done your research and asked the right questions - now it's time to talk payment. This step is crucial for keeping your cash flow steady and weeding out potential problem clients. By building on your earlier groundwork, you can secure your income and avoid unnecessary headaches.
Here’s the bottom line: your rate doesn’t mean much if you can’t actually collect it. As the Landolio team wisely says:
"Your rate doesn't matter if you can't collect it."
Clear payment terms remove ambiguity and turn potential income into actual earnings. They also act as a test - clients who resist fair terms often bring trouble later. A client willing to pay a deposit isn’t just financially committed; they’re mentally invested in the project’s success.
Set Payment Structure and Milestones
Start by laying out exactly when payments are due and how much they’ll be. For smaller projects under $500, request 50%–100% upfront. For mid-sized projects ($500–$5,000), aim for a 25%–50% deposit. For larger projects over $5,000, secure 25%–33% upfront and tie the remaining payments to clear milestones.
Breaking bigger projects into measurable deliverables - rather than arbitrary deadlines - can protect you. For instance, a $6,000 website project might look like this: $1,500 at kickoff, $1,500 at design approval, $1,500 at development completion, and $1,500 at launch. This way, even if things go off track, you’re not left with more than 30–40% unpaid.
Adopt Net-15 payment terms (payment due within 15 days) as a default. This keeps your cash flow moving faster than the typical Net-30 while still giving clients a reasonable timeframe. Always use specific dates in MM/DD/YYYY format instead of vague phrases like "payment upon completion", which can lead to delays.
To discourage late payments, include a monthly interest charge of 1.5% to 2% on overdue balances. This not only acts as a deterrent but also reinforces your professionalism. Add a clause to suspend work if an invoice is unpaid for more than 14 days past its due date - this ensures you’re not providing free work while waiting for payment.
Lastly, include a kill fee in your terms. If a client cancels the project halfway through, this fee (typically 25%–50% of the remaining balance) compensates you for the time you’ve already invested and the work you’ve delivered.
Use Tools Like Paid on Time
Chasing payments manually is frustrating and time-consuming. Once you’ve set your payment terms, streamline the process with tools like Paid on Time (https://paidontime.app). This platform lets you create agreements, secure payment methods upfront, and charge clients with a single click when milestones are completed.
Before you even start the project, clients agree to the payment terms and provide their payment method. When you hit a milestone or deliver the final product, you simply click to charge the agreed amount - no need for manual invoices or awkward reminders. The platform’s 5% transaction fee applies only when you get paid, and it automatically generates clear payment records.
This system reduces friction and ensures predictable cash flow. Instead of worrying about whether clients will pay, you operate with confidence. As the PactlyApp Blog puts it:
"A freelancer's cash flow is their lifeblood. By structuring bulletproof payment terms... you move from a position of hope to a position of control."
Step 4: Set Communication Protocols and Boundaries
Once you've locked in payment terms, the next step is ensuring smooth collaboration by setting clear communication boundaries. These aren't just optional - they're key to maintaining focus and delivering high-quality work. As Thomas Kjeldahl Nilsson, a software developer and freelance coach, aptly says:
"Boundaries are essential for getting the best possible work from you".
Establish these protocols before starting any work or sending invoices. This avoids misunderstandings, like clients expecting immediate replies at all hours. Clear, predictable communication fosters better outcomes for everyone involved.
Agree on Response Times and Channels
Be specific about how and when communication will happen. Assign distinct roles to each platform: use email for formal decisions, project management tools for task updates, and video calls for in-depth discussions. Messaging apps like Slack? Keep those for quick, simple clarifications.
Set a clear response time - something like "within 24 hours on weekdays" works well. This helps manage expectations and reduces unnecessary follow-ups. Share your working hours upfront and stick to them. Outside these hours, set your status to offline. Research from Purdue University in 2016 highlighted that clear work-life boundaries can reduce burnout and stress while improving overall well-being.
If a client reaches out through an unapproved channel (like texting your personal number when email was agreed upon), kindly redirect them back to the designated platform. This reinforces your boundaries without creating friction.
Decide on Meeting Frequency and Deliverables Format
Agree on how often you'll check in. For longer projects, weekly updates might suffice, while faster-paced work might need twice-weekly meetings. At the start of the project, explain how you'll handle delays, revisions, and designate a single point of contact on the client's side.
Clarify how you'll deliver work - whether in PDFs, Word documents, or another format - and outline how feedback should be consolidated. Encourage clients to provide all their input in one document or session instead of piecemeal messages. This reduces confusion and keeps things efficient. Document these protocols in a simple onboarding guide to ensure everyone's on the same page.
When combined with your payment and project guidelines, these communication rules create a foundation for effective and hassle-free collaboration.
Step 5: Start with a Small Trial Task
You’ve done your homework - researched the client, asked smart questions, agreed on payment terms, and set boundaries for communication. Now it’s time to put all that groundwork to the test with a small trial task. This step helps you gauge how the client operates in a real work scenario. It reveals key behaviors like whether they pay on time, stick to the agreed scope, and communicate effectively.
Propose a Paid Mini-Project
Keep the trial simple and focused, designed to take just a few hours. For example, if you’re a writer, suggest a 500-word article. If you’re a designer, offer to create a single-page mockup. Kate Richardson from FreeUp puts it perfectly:
"A paid test project is more than just a skills assessment - it's a trust-building tool".
Make sure the project is paid, using a fixed rate with a 50% upfront deposit. This ensures the client has a real budget and is serious about the collaboration. Be clear about deadlines, especially when it comes to receiving materials like logos, brand guidelines, or access credentials. Let the client know your timeline starts only after you have everything you need.
Document Outcomes and Feedback
Throughout the trial, take note of key details: Did the client pay on time? Did they stick to the agreed scope, or try to sneak in extra work? How quickly did they respond to your questions? Evaluate their performance on factors like feedback quality, timeliness, communication, and scope adherence, scoring each on a 1–5 scale.
Keep thorough records of everything from contracts to final deliverables. These can protect you if disputes arise and serve as a reference for future projects. If the client excels during the trial, you’ve built a foundation of trust and can move forward confidently. If not, you’ve only spent a few hours, saving yourself from bigger headaches down the line. A well-executed trial task ensures that every client you choose to work with aligns with your standards.
Conclusion
Taking these five steps not only helps you identify potential red flags but also lays the groundwork for strong, professional relationships. Vetting is the cornerstone of running a thriving freelance business. Each stage - from initial research to trial tasks - acts as a safety net, protecting your time and income from unreliable clients.
The statistics paint a clear picture: 62% of UK freelancers have faced issues like late payments, scope creep, or poor communication. Investing just one hour in proper vetting can save you 10+ hours of headaches down the line, whether it’s chasing payments or resolving disputes. As Landolio wisely states:
"The cost of turning down a bad client is always less than the cost of working with one".
Tools like Paid on Time (https://paidontime.app) make this process even easier. By securing payment methods upfront and enabling one-click charges after project completion, you can skip manual invoicing and uncomfortable payment discussions. Instead, you’ll have clear agreements, steady cash flow, and more time to focus on your work - not chasing payments.
This approach not only safeguards your business but also sets a professional tone from the start. A structured vetting process shows clients that you take your work seriously. The right clients will appreciate this, while the wrong ones will reveal themselves early - before you’ve poured time into a project that won’t pay off. Saying "no" to a bad fit clears the way for better opportunities.
Your time is your most valuable resource. Protect it by carefully vetting every client. The freedom and stability you want as a freelancer start with choosing the right people to work with.
FAQs
What are the biggest red flags a client might not pay?
Some clear warning signs to keep an eye on include:
- Resistance to contracts or clear payment terms: If a client pushes back on having a formal agreement, that’s a major red flag.
- Attempts to unfairly change payment conditions: This could mean trying to renegotiate terms after agreeing to them or introducing conditions that weren’t discussed.
- Refusal to sign agreements: A client unwilling to put things in writing might not have the best intentions.
- Delaying payment until they’re paid by their own clients: This creates unnecessary risk for you and demonstrates poor financial management on their part.
- Avoidance of formalizing terms altogether: If they consistently sidestep discussions about clear terms, proceed with caution.
Recognizing these behaviors early can save you from potential non-payment headaches down the road.
What should I include in a simple freelance payment agreement?
A freelance payment agreement needs to outline a few essential details to keep everything crystal clear. Start with the payment amount and schedule - whether that's net-15, net-30, or another timeline. Define what triggers the payment, such as submitting an invoice or completing the project.
Don’t forget to include specifics like deposits or retainers, preferred payment methods, and any late payment penalties. These details not only set clear expectations but also help safeguard your income and minimize the chances of disputes down the road.
How do I price and structure a paid trial project?
When setting up a paid trial project, it's all about creating a fair and transparent arrangement to evaluate a freelancer's skills and compatibility for the job. Start by clearly defining the scope of the project, the expected deliverables, and the payment terms. This ensures both parties are on the same page from the beginning.
Make sure the compensation is reasonable - something that reflects the effort required while motivating the freelancer to deliver their best work. A well-structured trial not only sets clear expectations but also provides a low-risk way for both sides to assess whether a longer-term collaboration would be a good fit.