How to Write a Scope of Work for Freelance Projects
How to Write a Scope of Work for Freelance Projects
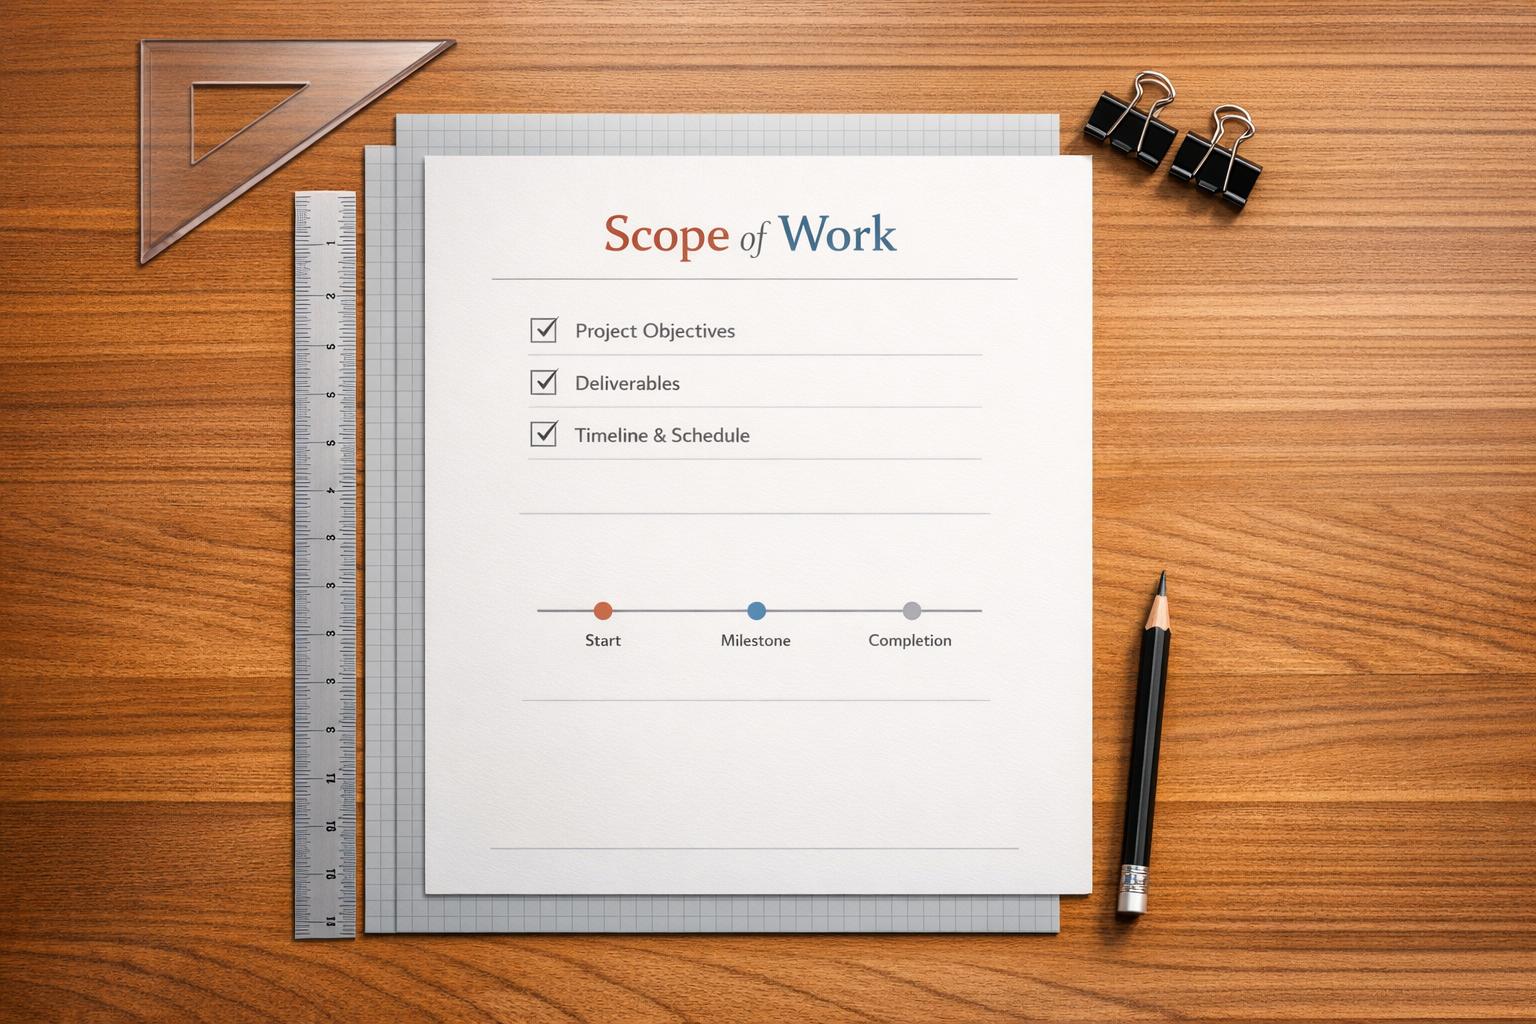
A Scope of Work (SOW) is your roadmap for freelance projects. It defines what you’ll deliver, when, and for how much. Without it, you risk scope creep, payment issues, and endless revisions. Here’s how to create one:
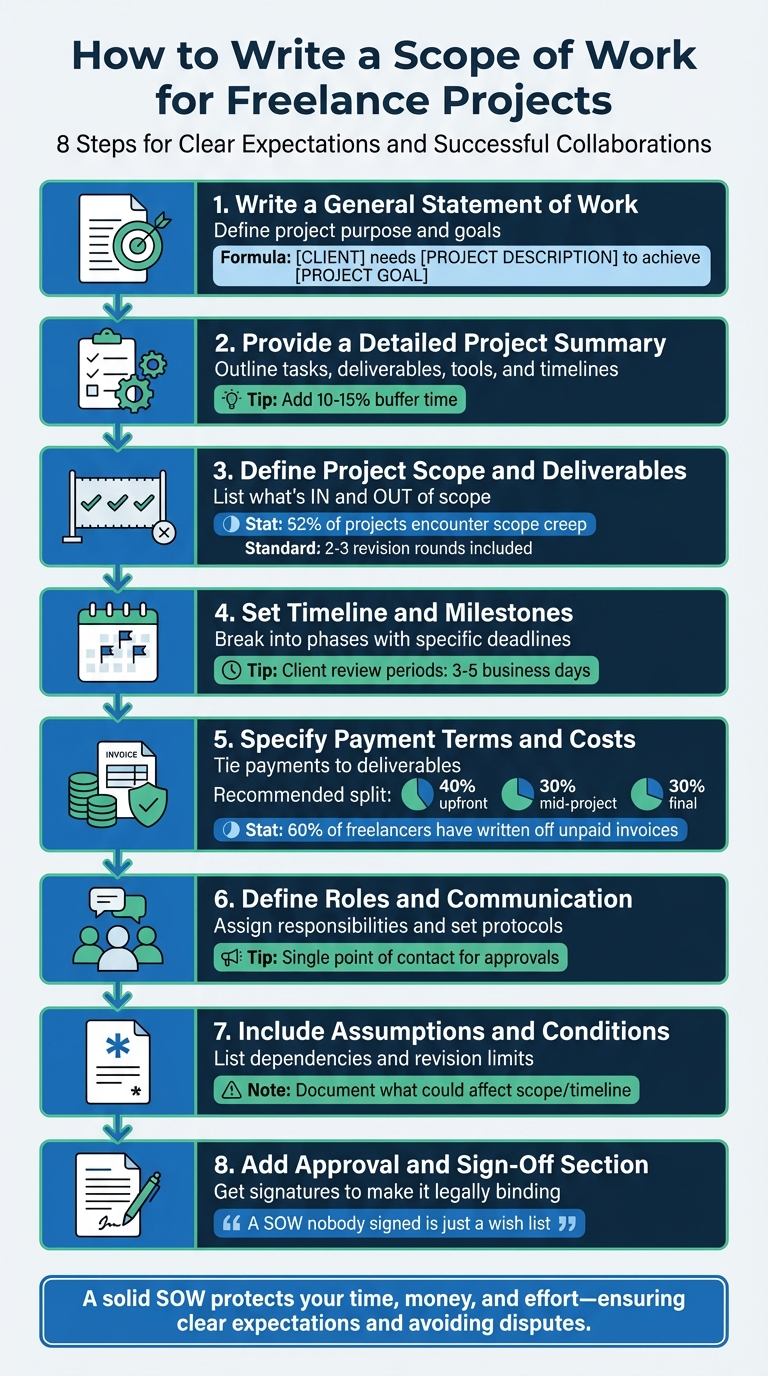
- Start with a General Statement: Clearly explain the project’s purpose and goals.
- Detail the Project Summary: Break down tasks, deliverables, tools, and timelines.
- Define Scope and Deliverables: Specify what’s included - and what’s not.
- Set a Timeline: Map out phases and milestones, including buffer time.
- Outline Payment Terms: Tie payments to milestones and include late payment penalties.
- Clarify Roles and Communication: Assign responsibilities and set feedback protocols.
- Document Assumptions: List dependencies and revision limits.
- Secure Sign-Offs: Get signatures to make the SOW legally binding.
A solid SOW protects your time, money, and effort. It ensures clear expectations, keeps projects on track, and helps avoid disputes.
8-Step Process for Writing a Freelance Scope of Work
What is a Statement of Work and do you need one as a freelancer?
sbb-itb-66f4c95
Step 1: Write a General Statement of Work
The General Statement of Work is a short, clear summary that explains the purpose of your project. Think of it as the big-picture overview that ensures everyone understands the "why" before diving into the specifics. It answers three key questions: What are you doing? Who is it for? What does success look like?. Without this clarity, you risk confusion, unpaid extra work, and disagreements later on. To avoid these pitfalls, use a straightforward approach to define your project's intent.
How to Structure Your General Statement
Once you’ve clarified the purpose, organize your statement in a way that's simple and measurable. A helpful formula is: [CLIENT] needs [PROJECT DESCRIPTION] to achieve [PROJECT GOAL]. The goal here is to focus on specifics and measurable results.
For instance, instead of vaguely stating, "redesign the website", you could write: "Redesign the marketing website to increase conversion rate from 2.1% to 3.5% by June 1, 2026". Or, for a content-related project: "Increase brand visibility and drive organic traffic by 25% in the next six months by publishing weekly SEO-optimized content targeting relevant keywords".
To ensure your statement is clear, try the Family Member Test: could someone outside the project explain what you're delivering and how success will be measured after reading it? If not, simplify it. Keep this part broad and easy to understand. Save the nitty-gritty details for later sections.
Step 2: Provide a Detailed Project Summary
Once you've outlined your general project goals, it's time to dive into the specifics. A detailed project summary should explain exactly how you'll execute the work. Think of it as answering key questions: What steps will you take? What tools will you rely on? How long will each phase take? This level of detail helps avoid scope creep and ensures everyone is on the same page.
It's also important to differentiate between tasks (the actions you'll perform) and deliverables (the concrete outputs your client will receive). For instance, "redesign landing page" is a task, while "functional landing page coded in HTML/CSS" is the deliverable.
Gregory Shein, CEO & Founder of Corcava, explains it well: "If you can't point to it as a file, mockup, or artifact, it's not a deliverable".
After defining tasks and deliverables, clearly outline the tools, methods, and timeline to set expectations.
Include Tools, Methods, and Timelines
Be precise about the tools and resources you'll use. Instead of saying "design software", specify tools like Figma, Adobe Creative Cloud, or Sketch. If you're working on a website, mention platforms like WordPress or Shopify and include technical details like PHP 8.2 or React. This level of transparency avoids confusion.
Make sure to include review periods in your timeline. For example, allocate three business days for wireframe feedback and five days for reviewing the staging site. Be upfront that delays in client feedback will result in adjusted timelines. To safeguard against unexpected issues, add a 10–15% buffer to your schedule. This is especially important when only 29% of organizations manage to complete projects on time.
Create a Step-by-Step Breakdown
Breaking the project into clear phases helps maintain an organized workflow. Arrange these phases in chronological order to ensure logical progression. For example, a web design project might include:
- Discovery (Weeks 1–2): Deliverables could include a research report and sitemap.
- Design (Weeks 3–5): Deliverables might include two design concepts and final mockups.
- Development (Weeks 6–9): Deliverables could be a functional staging site.
- QA & Launch (Week 10): Deliverables might include a fully tested, live website.
For each phase, outline the specific deliverables your client can expect. When planning tasks, break them down into smaller segments of 1–4 hours to make them manageable and easy to track. Use headers and bullet points to keep your summary scannable and client-friendly.
If the project is complex or subject to changes, provide a detailed plan for the initial phase and use estimates for later stages. Reassess and adjust the scope as you reach milestones. This approach ensures flexibility while keeping the project on track.
Step 3: Define the Project Scope and Deliverables
Once you’ve outlined your project summary, the next step is to clearly define the scope and deliverables. This step is crucial for managing expectations and avoiding scope creep, which can eat into your time and profits. In fact, the Project Management Institute reports that 52% of all projects encounter scope creep. That statistic alone underscores the importance of setting firm boundaries from the start.
How to List In-Scope Work
Specificity is your best friend here. For example, instead of vaguely stating "website design", you could write: "12-page responsive website built on WordPress, including a blog index and contact form”. This level of detail leaves little room for misinterpretation and keeps everyone on the same page.
Use this same approach across all deliverables. Don’t just say "logo design." Spell it out: "Primary logo (full color, monochrome, reversed) provided in SVG, PNG, and EPS formats”. Similarly, instead of just writing "strategy", clarify with something like: "Brand Strategy Document (PDF, 15–20 pages)".
Revisions deserve special attention too. The standard in most industries is 2–3 rounds. Define what a "round" means - such as one consolidated batch of feedback - and make it clear that extra rounds will incur additional costs, often billed at $150 per hour.
Specify Out-of-Scope Work
Equally important is outlining what’s not included in the project. This prevents confusion and avoids unpaid work. Clients may assume services like SEO, copywriting, or stock photo licensing are part of the deal. To address this, create a dedicated "Out of Scope" section. For instance, in a website project, you might specify: "This project does not include web hosting, domain registration, content writing, or third-party API fees”. For logo design, you could add: "This project does not include full brand identity, social media kits, or business card design”.
Spelling out exclusions protects your profit margin by setting clear boundaries.
As OwnedWork aptly puts it: "If it is not on the list, it is not included”.
Finally, include a change order process in your Scope of Work. Make it clear that any additional requests require a written amendment with updated costs and timelines. For example, when a client asks for an extra feature, you could reply: "That’s a great idea. Let me prepare a change order with the additional cost and timeline so we can add it properly”.
Step 4: Set a Timeline and Milestones
Once you’ve nailed down the deliverables, the next step is to map out a timeline to ensure everything gets done on schedule. Break the project into clear phases - like Discovery, Design, Development, and QA - and assign deadlines to each. For example, you might say, “Phase 1: Wireframes delivered by May 8, 2026.” This structure makes tracking progress much easier.
Create Milestones to Track Progress
Milestones are only useful if they’re tied to specific, measurable outcomes. Avoid vague entries like “strategy” or “meetings.” Instead, aim for something concrete, like “Research report and sitemap delivered by Week 2” or “15 Instagram graphics with captions delivered by May 8, 2026.” These milestones should directly align with the deliverables you outlined earlier, keeping everything consistent and easy to follow.
Don’t forget to define client review periods. Specify how many business days they have to provide feedback - typically 3–5 days - and make it clear that delays on their end will push back the final deadline.
Gregory Shein, CEO & Founder of Corcava, emphasizes: "If the client takes two weeks to review designs instead of three days, the launch date moves. Make this explicit".
You can also include a clause stating that if feedback isn’t received within the agreed window, the deliverable will be automatically approved. This keeps the project moving forward and avoids unnecessary bottlenecks. Adding buffer time around these milestones can further protect your schedule.
Add Buffer Time
Let’s face it - projects rarely go exactly as planned. Build in 10–15% extra time to account for unexpected issues, whether it’s a technical hiccup, a last-minute client change, or someone calling in sick. If you’re new to managing timelines, try the 1.5x multiplier: if you think a task will take two weeks, plan for three. This way, you’re prepared for surprises without overpromising.
Spread this buffer time strategically. For example, add 2–3 extra days after each client feedback phase and another 2–3 days before the final delivery to fine-tune everything. With this approach, you’ll have a realistic timeline that accommodates both planned tasks and the inevitable curveballs.
Step 5: Specify Payment Terms and Costs
Once you've established a clear timeline and milestones, it's time to focus on securing your payment. This part of your Statement of Work (SOW) is crucial for protecting your cash flow and ensuring everyone is on the same page about how and when payments will be made. Late payments are a widespread issue - 60% of freelancers have had to write off unpaid invoices entirely. Just as defined deliverables safeguard your work, clearly outlined payment terms ensure your financial stability.
The best strategy? Front-load your payment schedule and tie every invoice to a specific, tangible deliverable. Aim to collect 70–75% of your total fee before handing over final files. This approach keeps you in control while encouraging client engagement throughout the project.
Break Down Payment Schedules
Rather than waiting until the end of the project, split payments into milestone-based installments. A common structure is a three-part split: 40% upfront at contract signing, 30% when the first draft is delivered, and 30% upon final delivery. For instance, if your project fee is $5,000, a 40/30/30 split ensures steady income as you progress.
Each payment should be tied to a specific, measurable deliverable, like "delivery of wireframes" or "approval of homepage design", instead of vague milestones like "50% complete". Use Net-15 terms (payment due within 15 days), but for newer or higher-risk clients, consider shorter terms like Net-7 or even payment on receipt.
To maintain momentum, include a "no payment, no progress" clause, which states that work on the next phase won't begin until the previous payment is cleared. Another helpful addition is a "deemed approved" clause, which automatically approves a deliverable - and triggers payment - if the client doesn’t provide feedback within five business days. These clauses keep payments consistent and eliminate unnecessary delays.
"When you invoice only at the end of a project, you're giving the client maximum leverage and yourself zero protection", explains Landolio.
Additionally, make it clear that intellectual property rights transfer only after full payment. This ensures your work is safeguarded if a client fails to settle the final invoice. These steps not only protect your earnings but also simplify your invoicing process.
Secure Payment Methods in Advance
To avoid payment delays, secure payment details upfront. Specify the accepted methods - such as bank transfer, PayPal, or Stripe - in your SOW [22,26].
Using tools like Paid on Time can streamline this process even further. These platforms let you secure payment methods when the agreement is signed, enabling you to charge clients with a single click once milestones are completed. This minimizes manual invoicing and reduces the time spent on billing. When payment terms are clearly defined from the start, enforcing them becomes straightforward and avoids awkward follow-ups.
Lastly, include late payment penalties - such as 1.5% monthly interest on overdue balances - to encourage timely payments.
Step 6: Define Roles, Responsibilities, and Communication Protocols
Breaking down roles and responsibilities right from the start can save a project from unnecessary delays. When everyone knows exactly what they’re accountable for, you avoid those awkward “I thought you were handling that” moments that can throw off your timeline. To keep things running smoothly, make sure all dependencies are documented so everyone stays on the same page.
Define Freelancer and Client Responsibilities
Start by clearly outlining what the freelancer is responsible for. This might include tasks like building project elements, submitting weekly progress updates, handling two to three rounds of revisions, and delivering final assets in agreed-upon formats. On the client’s side, list what they need to provide: copy, images, brand guidelines, hosting or CMS credentials, and any necessary hardware for testing.
Be specific about dependencies. For instance, if the client delays providing brand guidelines, make it clear that the final delivery date will be adjusted accordingly, on a day-for-day basis. To streamline the revision process, require the client to gather all stakeholder feedback into one consolidated batch for each revision round, rather than sending in a constant stream of individual requests.
"A 'round' means the client collects all their feedback and sends it to you in one batch, and you implement those changes. This is different from a continuous drip of individual requests, which should be discouraged." – OwnedWork
Also, assign a single point of contact on the client’s side who has the authority to approve decisions. This helps avoid confusion when multiple stakeholders are involved and ensures a smoother workflow.
Set Communication Expectations
Establishing how you’ll communicate with your client is just as important as defining responsibilities. Decide on the tools you’ll use - whether it’s Slack for quick questions, email for formal updates, or Zoom for weekly check-ins - and agree on how often updates will be shared. Define response times for both parties, such as replying to emails within 24 hours or reviewing deliverables within three to five business days.
Include a clause stating that if the client doesn’t respond within five business days, their silence will be considered approval of the deliverables. After every meeting or call, send a written summary to ensure alignment. Additionally, make it clear that any changes to the budget, timeline, or project scope must be documented in writing to be valid.
| Protocol Element | Freelancer Responsibility | Client Responsibility |
|---|---|---|
| Assets & Access | Request necessary files early | Provide copy, images, and logins by agreed deadlines |
| Feedback | Set defined review periods | Consolidate feedback into rounds rather than drips |
| Approvals | Submit deliverables at milestones | Provide written sign-off within 3–5 business days |
| Meetings | Set agenda and send summaries | Attend scheduled check-ins (e.g., weekly standups) |
| Scope Changes | Document change orders in writing | Approve or reject change orders in writing |
Step 7: Include Assumptions and Special Conditions
Once roles and timelines are established, it's time to outline the assumptions and special conditions that will guide the project. These elements clarify external dependencies, revision protocols, and other factors that could affect the project's progress. Every project relies on certain conditions being met - whether it's the client providing assets on time, third-party APIs functioning properly, or seamless integration of new features with existing systems. These assumptions are essentially educated guesses about what will hold true during the project, even if they haven't been fully confirmed.
"Assumptions are things you're taking for granted. If any of them turn out to be wrong, the scope, timeline, or budget may change." – Gregory Shein, CEO & Founder of Corcava
Documenting these assumptions is a safeguard against unexpected delays. For example, if a client fails to deliver brand guidelines or a third-party API encounters issues, having these assumptions in writing allows you to adjust the scope or timeline accordingly. This step helps separate the factors within your control from those that depend on external inputs.
List Project Assumptions
Take time to list all the conditions that are critical for the project's success. As mentioned earlier, timely inputs from clients and deliverables from third parties are often key. Be specific about client dependencies. For instance, you might note that the timeline assumes the client will deliver high-resolution images and final copy by April 15, 2026, or that they will provide administrative access to DNS, CMS, and Analytics by the project kickoff date. For technical projects, include assumptions like software compatibility (e.g., "Project assumes hosting environment supports PHP 8.2") or database specifications that are essential for your deliverables.
Additionally, outline communication expectations. For example, you might specify that all feedback will be consolidated through a single point of contact. You could also include a clause such as, "Client will review deliverables within three to five business days. If no feedback is received during this time, the deliverable will be considered approved." This ensures that delays in client responses don't derail the timeline.
Define Revision Limits and Change Requests
Setting clear limits on revisions is another way to keep the project on track and within scope. Define what a "round" of revisions entails - typically, this means the client gathers all feedback from their team and submits it as a single, consolidated batch rather than piecemeal updates.
For any work that falls outside the agreed-upon scope, require a formal change order. This includes additional features, extra rounds of revisions, or new deliverables. Be transparent about the costs and timelines for such changes. For instance: "Design phase includes up to two revision rounds per deliverable. Additional revisions will be billed at $150/hour." Once a deliverable has been formally approved, any further changes - no matter how small - should also be treated as new change orders requiring additional fees.
| Type | Details | Example |
|---|---|---|
| Client Resources | Assets and access needed from the client | "Client provides brand guidelines and logo files by 4/10/2026" |
| Technical Requirements | Software versions, hosting specs, browser support | "Project assumes WordPress 6.5+ and PHP 8.2 compatibility" |
| Third-Party Dependencies | External services or vendors | "API documentation from vendor is accurate and available" |
| Revision Structure | Number of rounds and feedback process | "Two revision rounds included; extras at $150/hr" |
| Approval Timeline | Client review and sign-off windows | "Client reviews deliverables within 3–5 business days" |
Step 8: Add an Approval and Sign-Off Section
Once all project details, assumptions, and conditions are documented, the next step is to formalize the agreement with signatures from both parties. A signed Statement of Work (SOW) turns your document into a legally binding contract, offering protection for both you and your client while establishing clear expectations.
"A contract reflects professionalism. It protects both you and your client by putting expectations in writing before work begins." – OwnedWork
Without signatures, the SOW lacks legal enforceability. A signed agreement ensures you have a defensible document in case of disputes over scope, payment, or deliverables. It also acts as a definitive reference, avoiding misunderstandings or "selective amnesia" about verbal agreements.
Why Signatures Are Crucial
A signed SOW creates enforceable expectations. This legal backing means that if one party breaches the agreement, you have a solid foundation for resolution. It also formalizes intellectual property (IP) transfer and provides a clear framework for handling potential disputes.
The signature section should include spaces for printed names, signatures, and dates for both you and your client. Ensure the person signing on behalf of the client has the authority to enter into agreements, as a signature from someone without proper authorization may not hold up legally. Additionally, define the "effective date" to clarify when the project officially begins.
If a client is hesitant or outright refuses to sign the agreement, take it as a warning sign - it could indicate future challenges, such as scope changes or payment delays.
How to Request Sign-Off
Before asking for a signature, schedule a walkthrough of the SOW with your client. This can be done during a kickoff call or video meeting. Reviewing the document together ensures alignment and provides an opportunity to address any questions or concerns.
For remote projects, digital signatures are a game-changer. They are legally binding under the U.S. ESIGN Act, offer an audit trail with timestamps and IP addresses, and can cut turnaround time from several days to under 24 hours.
Another approach is to share the SOW as a collaborative document (e.g., a Google Doc) so the client can add comments before finalizing it for signatures. Once both parties agree on the final version, request the digital signatures and ensure no work begins until the SOW is fully signed.
To further streamline the process, link your payment schedule to sign-off milestones. For instance, you might require 30% payment upon SOW approval, another 30% at concept approval, and the final 40% upon project completion. Tools like Paid on Time simplify this process by securing payment methods upfront and enabling one-click charges upon milestone completion, minimizing manual invoicing and reducing the risk of payment disputes.
Conclusion
Review of Key Steps
A well-written SOW (Statement of Work) is your best defense against scope creep, payment disputes, and endless revisions. Start with a concise general statement that explains the project's purpose. Then, include a detailed summary outlining the tools, methods, and timelines. Be very clear about what’s included in the scope - and what isn’t. If it’s not listed, it’s not part of the deal. Break the project into milestones with specific deadlines, and don’t forget to build in some buffer time for unexpected hiccups. Specify payment terms tied to deliverables, clearly assign roles and responsibilities, list any assumptions, set limits on revisions (usually two or three rounds), and always get written approval.
"A SOW nobody signed is just a wish list".
A clear and detailed SOW isn’t just a roadmap for the project - it’s a reflection of your professionalism. These steps are essential for managing freelance projects effectively.
Final Tips for Freelancers
By sticking to these steps, you protect both your time and your earnings. Scope creep can eat into your profits, but a solid SOW is your go-to document for clarifying what was agreed upon. It sets boundaries, ensures you get paid fairly, and defines when the project is officially complete. For larger projects - those over $25,000 or lasting longer than three months - consider creating a comprehensive SOW that includes legal terms.
To make sure you’re paid on time and avoid unnecessary stress, try using Paid on Time. This tool lets you secure payment methods upfront and simplifies invoicing with one-click charges when milestones are completed. It’s a simple way to minimize payment disputes and focus on delivering great work.
FAQs
How detailed should a freelance SOW be?
A freelance Scope of Work (SOW) needs to lay out clear and detailed information about deliverables, timelines, responsibilities, and boundaries. This helps avoid confusion and prevents "scope creep" - when project requirements grow beyond what was initially agreed upon. Even for smaller projects, it's important to outline expectations and schedules to protect both the freelancer and the client. A solid SOW serves as a roadmap, keeping things clear and minimizing the chances of disputes during the project.
What should I do when a client asks for extra work mid-project?
When a client asks for additional work during a project, the first step is to review your Scope of Work (SOW) or contract. This document outlines the original deliverables and helps clarify whether the new request falls within the agreed scope.
If the request goes beyond what was initially agreed upon, communicate this to the client. Politely explain the situation and suggest either revising the SOW or drafting a change order. Make sure to include a written agreement that covers the extra time and payment required for the additional work. This approach helps prevent misunderstandings and ensures both you and the client are on the same page.
How can I make sure I get paid on time with a SOW?
To make sure you get paid on time when working with a Scope of Work (SOW), it's crucial to include clear payment terms. Specify triggers like milestones or upfront deposits to set expectations. Pair your SOW with a thorough contract that outlines payment deadlines, late fees, and what happens if payments are missed. Tools like Paid on Time can streamline the process by securing upfront payments and minimizing disputes, helping you receive payment quickly once your work is done.